News — Wednesday Project
art+craft markets, Month of Makers, Virtual Market, Wednesday Project
Wednesday Project: Westward Whiskey Fall Spice Old Fashioned
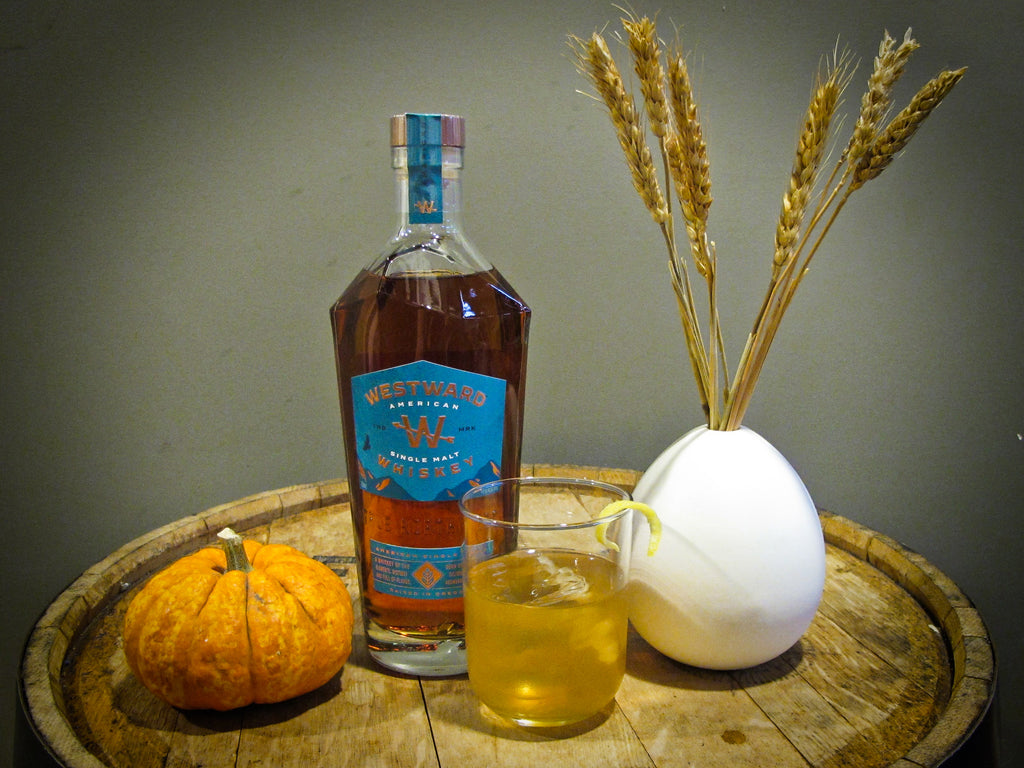
For our final Wednesday Project in our Month of Makers we thought it would be fun to share with you a delicious cocktail recipe using ingredients from our vendors! Thank you to Westward Whiskey and Micah Anderson for this recipe! Westward Whiskey is participating in our Virtual Market this Saturday, December 12th! Join their LIVE cocktail class on their Instagram at 12:00pm PST!
Westward Whiskey Fall Spice Old Fashioned
Created by Micah Anderson
For nearly two decades, we have brought something new, different, and relevant to whiskey, and we are proud to serve as a leading voice for American Single Malt. Inspired by the unparalleled culture, climate, natural ingredients, and people of the American Northwest; we set out to make a whiskey of the elements-- and along the way, we called it Westward.
Just in time for the holidays, here's one of our favorite twists on a classic-- a Fall Spice Old Fashioned, created by Portland's own Micah Anderson. You can find Micah on Instagram at @coacha27.

Ingredients:
* Westward American Single Malt Whiskey
* Portland Soda Works Ginger Syrup
* Portland Bitters Project Super Spice Bitters
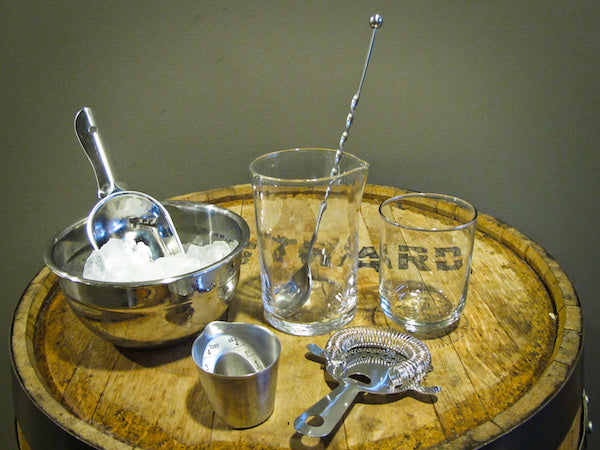
* Large mixing glass & bar spoon
* Jigger or shot glass
* Strainer
* Old fashioned or rocks glass
* Ice

1. Add all ingredients to mixing glass.
2. Add ice and stir until well mixed and cold (about 20-30 seconds).
3. Strain over fresh ice into cocktail glass.
4. Garnish with a star anise pod and an orange twist (if you're feeling fancy).

See Westward Whiskey LIVE on their Instagram at 12:00
THIS SATURDAY, December 12th in our last Virtual Market of 2020!
They will be doing a cocktail class! Perfect for the holiday times!!

Month of Makers, Virtual Market, Wednesday Project
Wednesday Project: 2020 Detox Bath Salt by Happy Handmade
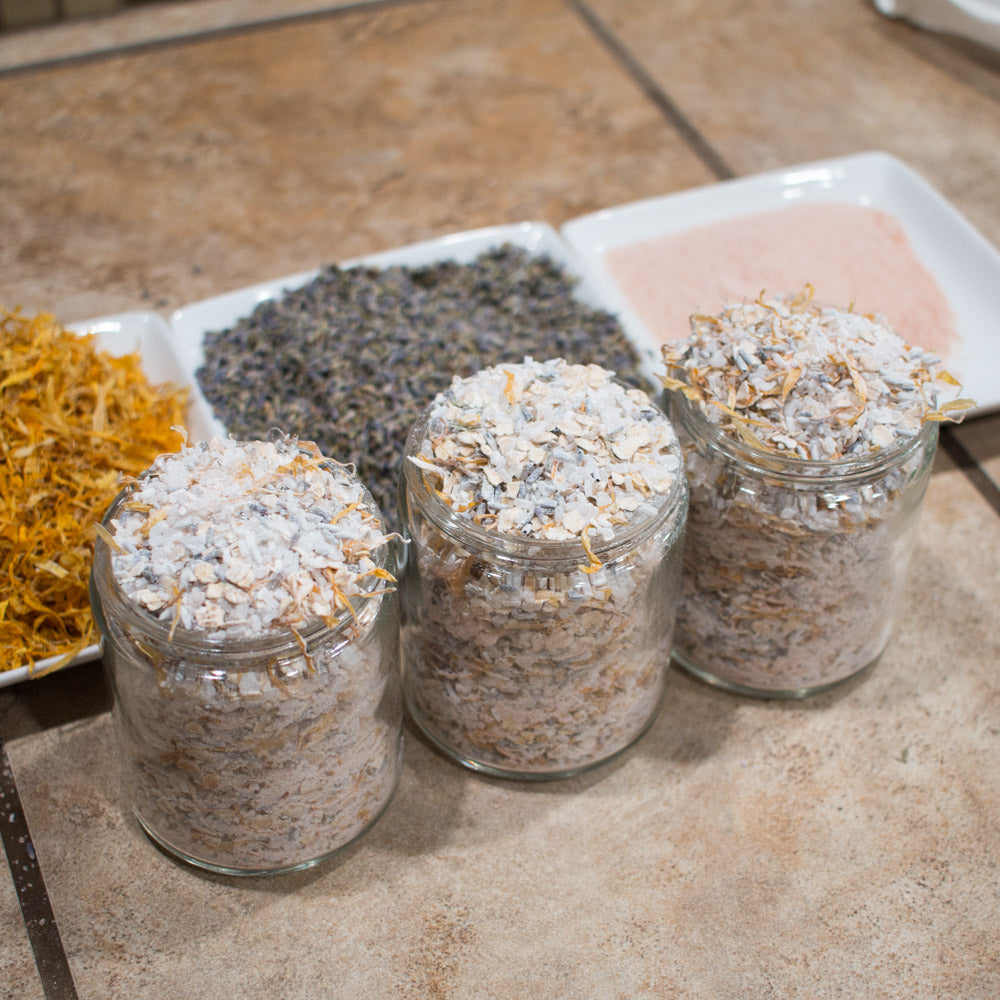
2020 Detox Bath Salt by Morgan Magras of Happy Handmade
Do you feel like you need to exorcise and detox 2020 out of your life for good? Well, you are not alone! While we still have a bit longer before this year is out of our lives, I’ve formulated this detoxifying bath salt to help your body reset, recuperate, and hopefully get rid of any bad juju it picked up in this trying year. Here is what you will need, I’ve included the percentages so it is very easy to scale, whether you want to make a small batch or enough for your whole city.

Ingredients:
Epsom salt 30%
Himalayan salt 20%
Lavender flowers 10%
Calendula petals 10%
Oatmeal 20%
Kaolin clay 10%
Essential oils of your choice ( I picked Lavender, Lemon, and Pine)
Holy water (Optional)
Items needed:
Mixing bowl
Spoon
Container
Sachet bag
Labels
This bath salt is great for soothing and healing the skin too!
Instructions:

Put all dry ingredients in mixing bowl and mix thoroughly.

Add your desired essential oils. I found how much you should add is a personal preference. You can start with a few drops of each and go from there.

Put in a container (mason jars are great) and label.

There you have it, you are ready to enjoy your bath salts.
For easy cleaning up, I highly recommended using a sachet bag! Put 3 heaping tablespoons in the bag and put it in your bathwater. Most of the contents will dissolve but the flower petals will remain in the bag.
Resources:
Salts
https://sfsalt.com
https://seasalt.com
Essential oils, clay, sachet bags, and flowers
https://www.libertynatural.com
https://www.herbco.com

About Morgan:
I was given the opportunity, at a young age, to travel the world. I found myself enamored with the indigenous cultures that I encountered, and intrigued with their nature-based approaches to health, beauty, and body care.
The wonderful cultures in which I found myself immersed, used the simplest of methods with profound results. Learning hands-on approaches to harmonize, nourish, and heal the body has been an extraordinary gift in my life.
When I returned stateside and realized how disconnected society had become from nature, and how complicated and adulterated even “natural” products had gotten, I felt compelled to make a difference.
It is my dream that Happy Handmade be a resource for harmonizing your Body, Mind, and Spirit. Happy handmade products are made by hand, from scratch, using simple organic ingredients in the Pacific Northwest.
Our goal is to help you find a simply pure product, while enhancing feelings of confidence and beauty… naturally.
So dive in and find your Happy place!
Happy Handmade is a vendor in our December 12th Virtual Market! See them LIVE on their Instagram (@happyhandmadeproducts) on Sat, Dec 12th from 1:30 - 2:00 showing their limited edition holiday items! And be sure to check out their website as well!
featured artist, Month of Makers, Virtual Market, Wednesday Project
Wednesday Project: Habanero Snack Mix with Sarah Marshall
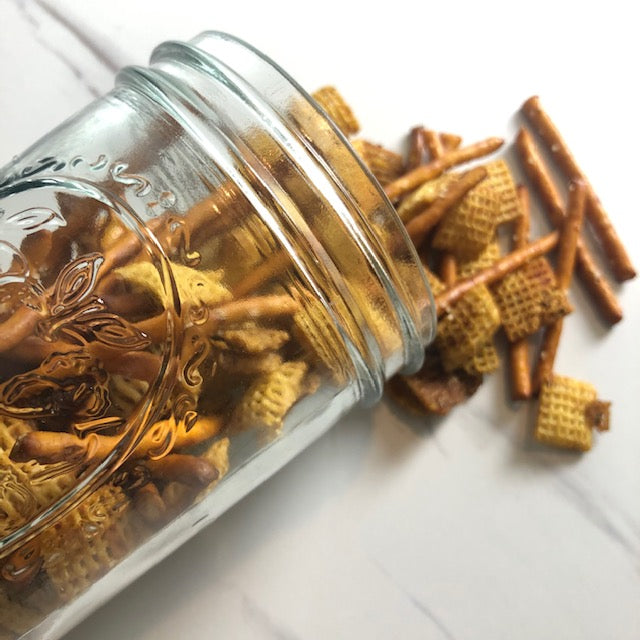
For our Wednesday Project this week, Sarah Marshall of Marshall's Haute Sauce is sharing her recipe for a habanero snack mix, just in time for holiday eating and gifting! You probably recognize Marshall's Haute Sauce from our Alberta shop and our craft markets. They also sell in lots of stores and markets around town!
Habanero Snack Mix
This recipe is perfect for gifting to your friends and family. It is crunchy, salty, and
spicy. When I used to share a kitchen with my gals, they would literally jump for
joy when they knew I was making a big batch of spicy snack mix. Tip: This recipe
is very approachable, for all skill levels and food allergies. Want it gluten free?
Use only rice cereal, GF pretzels, and the liquid aminos. Want it more or less
spicy? Adjust the hot sauce or cayenne to make the spice level fit your group.
Just remember if you up the sauce to decrease soy sauce, so it does not turn out
too soggy.
Ingredients
4 cups corn cereal
4 cups rice cereal
2 cups peanuts
2 cups pretzels
1 stick unsalted butter
1/3 cup Habanero Carrot Curry Marshall’s Haute Sauce
1/3 cup soy sauce or liquid aminos
2 tablespoons fresh lime juice
1 teaspoon dried Mexican oregano
1 teaspoon cayenne pepper
1 teaspoon kosher salt

Directions
1. Preheat the oven to 250 degrees.
2. Line two sheet pans with parchment paper.
3. In a large bowl mix cereals, peanuts, and pretzels.
4. In a medium sauce pan, over medium heat, melt the butter. Once the butter is
melted add the soy sauce and Habanero Carrot Curry Haute Sauce. Stir until
well mixed, remove from heat, stir in lime juice.
5. Mix dry and wet ingredients in the bowl, adding slowly and stirring to evenly
coat.
6. Spread the mixture evenly between two baking sheets.

7. Mix oregano, cayenne, and salt together.
8. Sprinkle spices evenly over snack mix and stir.
9. Bake for 45-60 minutes, stirring gently every 15 min, until dry and golden.
10. Let mix cool, once completely cool put into glass jars fitted with lids.

Sarah Marshall is the Owner of Marshall’s Haute Sauce in Portland, Oregon. Her small batch sauce company grew from her love of gardening, and background in home preserving. Sarah is passionate about farmers, artisan producers, and canning seasonal ingredients. Her love for canning and preserving all things local, inspired her to write Preservation Pantry: Modern Canning From Root To Top And Stem To Core.

Check out Marshall's Haute Sauce in our December 12th Virtual Market! They will be live on their Instagram from 12:00 - 12:30 demonstrating how to put together quick and easy holiday snacks and gifts. They are also donating a portion of their sales from the event to Equitable Giving Circle.
featured artist, Month of Makers, Virtual Market, Wednesday Project
Wednesday Project: Paper Sun + Moon Mobile by Corinne Lent!
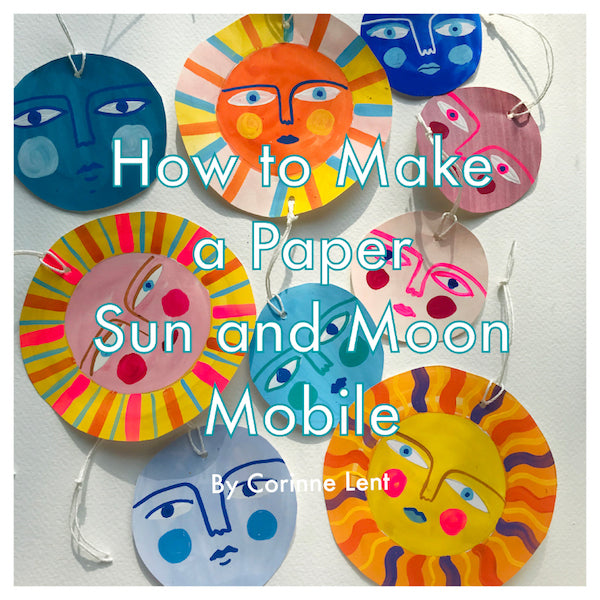
With a few materials you probably have lying around the house, you can make these super cute sun and moon mobiles! This project was created by Corinne Lent of Plant and Pattern. You can watch a video of this tutorial here, or follow the steps below!
Materials and Supplies List:
Heavy weight paper, card stock or crafting paper
Pencil
Your favorite art supplies - paint, colored pencil or markers
(I love acrylic paint or craft paint and posca paint pens for details.)
Any string (kitchen string, hemp cord, yard or embroidery thread)
Small bowl and smaller cup
Scissors
Hole puncher, skewer or sharpened pencil
Optional: Glitter, puff paint or metallic pens
HOW TO MAKE IT:
Step One
Make a large circle for your sun by tracing around your bowl or ramekin. Then make another smaller circle inside your larger circle using your cup. Now make another small circle for your moon.

Step Two
Draw triangles or lines around the inner circle to make sun rays. Now draw your faces.

Step Three
Using your favorite art supplies, draw or paint in your background colors leaving the eyes white. Don't worry about staying in the outside lines perfectly, we will cut them out later. Let this layer dry.

Step Four
Now add the details like eyes, nose, mouth and sun rays. I like giving mine rosey cheeks. You can also add glitter or puff paint to give them some sparkle. (Paint pens, markers or color pencils are great for making small details.)

Step Five
Time to cut out all your suns and moons.


Step Six
Using a hole puncher, skewer or something with a sharp end like a pencil, poke a hole through the top and bottom of the larger circle, and just the top of the smaller circle. Be careful not to poke your finger!

Step Seven
Cut TWO 8-13inch pieces of string. Fold one piece of string in half and lace the two ends through the top hole on your larger sun piece. Next, put the ends through the loop and pull snug.

Step Eight
Tie a knot at the top - this is where your mobile will hang from.

Step Nine
Now using the other string, repeat step seven for your smaller moon but without the top knot.

Step Ten
Once the string is attached to your moon lace the two ends through the bottom of your sun, flip over and tie a knot close to the top on the backside of your sun. Now lace the paper moon through the loop and pull snug. Trim excess string.

Step Eleven
Hang your Mobile!


Extra tip!
These also make great Christmas ornaments. Just do one string at the top or make garlands by putting holes on the sides!

Have fun making your magical suns and moons and please tag us so we can see your celestial creations!
@corinnelent + @craftywonderland

About Corinne:
Making art is a sacred ritual for me and I love depicting that magic in my work. You will find influences of folk art, mysticism and culture in my art. I explore many mediums such as ceramics, papier mache, and textiles which allows me to offer an array of special handmade goods while always pushing myself creatively. And color. I LOVE COLOR.
Corinne will be vending at our upcoming Virtual Market on December 12th with her business, Plant and Pattern! Catch her LIVE on her Instagram (@corinnelent) on Sat, Dec 12th from 11:00 - 12:00! She'll be doing live sketchbook drawing and painting with a topic of: How do we find our 'style'? And be sure to check out Corinne's beautiful work on her Instagram and Etsy shop!